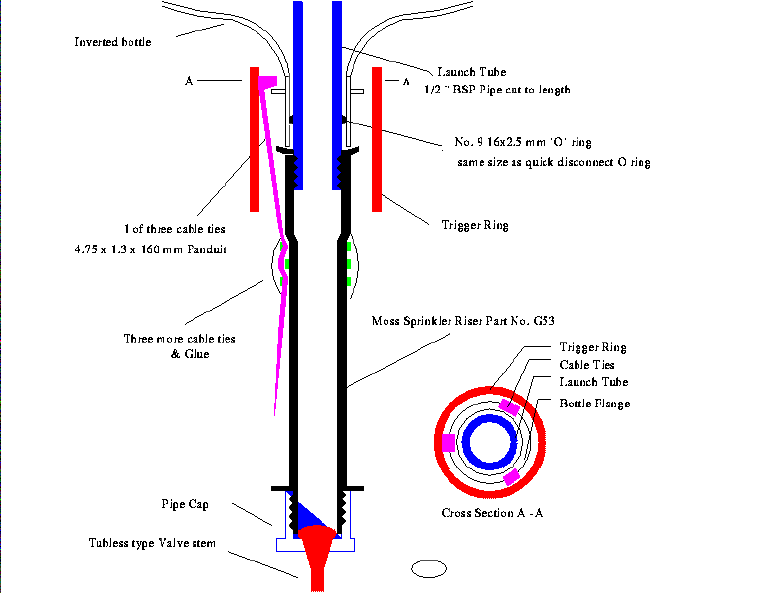
These are the bits required:
The base of the launcher is a Moss G53 sprinkler riser. This has a
male 1/2" BSP thread on the bottom and a 1/2" BSP female thread on the top.
Into the top is screwed a launch tube that is cut from the 600mm tube.
The threaded end of this tube screws into the top of the sprinkler riser,
which leaves the 'O' ring groove about 12 mm above the top of the
sprinkler riser.
The groove on my tubes was too shallow for the
correct size 'O' ring to seal in the neck of the bottle, but a No.9 (same
size as on a quick disconnect hose fitting) 'O'
ring, stretched and forced onto the pipe and into the groove, fits the
bottle neck perfectly.
On the bottom of the sprinkler riser I fitted an end cap, drilled to take a
tubeless tyre valve fitting. I don't use a valve in this, Its just convenient to
hook my pump to.
To hold the bottle down I use 3 cable ties. These are not used as cable ties as
such, but are used to clamp onto the flange on the neck of the bottle. These
cable ties are attached to the sprinkler riser so that their heads just fit
over the bottle rim in the launch position. Because of the flexibility of the
ties the bottle can normally slip past. However when the 'trigger ring' is
pushed upwards, it prevents the heads of the cable ties from moving outwards,
retaining the rocket on the launcher. The result is a gentle pull downwards on
a string attached to the trigger ring will launch the rocket.
My prototype used slightly smaller cable ties, 3.2 x 1.3 mm tail with 6.4 x 6.5 x 5mm head. I pull tested
a couple of these smaller ties and they failed at around 35 pounds pull. The throat of the soft drink bottle is
approximately 1/2 a square inch, so the force on the bottle with 100 psi is 50 pounds. 3 of the smaller ties
should be able to hold 3 x 35 pounds = 100 pounds, twice what is required. (Well, at least untill I get a
better pump.)
To hold the release cable ties to the body of the launcher I used 3 more cable ties around them and the sprinkler riser. The sprinkler riser has ridge about 30 mm from the top which I took advantage of to stop the cable ties moving. I smothered this ridge and the cable ties with hot melt glue to keep everything in place. An epoxy type glue would probably be a better choice, but I've had no trouble so far with the hot melt glue.
In use I attach the launcher to a milk crate to keep it vertical, and run the
string from the trigger tube down through a steel ring and out to me.
A typical launch sequence is to fill the bottle with around 30% water, tip the milk crate and launcher over
so the launch tube is pointing slightly downwards, then slide the bottle over the launch tube and the 'O'
ring. Normally a bit of a twist is required to get over the 'O' ring. I then bring the launcher back to
vertical and lift the trigger ring over the cable ties. An upward pull on the bottle er, rocket pushes
the heads of the cable ties out against the trigger ring, stopping it from falling downwards again. Now
its just a matter of pumping up to launch pressure, checking for errant children, dogs or physics
teachers and letting it rip!

| Back to Water-Rocket Page |